The following article that I share with you is a summarized practical guide that will help you during your first steps with the harmonica. I will teach you the basics you need to know, from how to hold the harmonica to how to achieve some of its “missing notes”, so you can start playing your first favorite songs without too much difficulty.
To get going you will need a 10-hole diatonic harmonica in the Key of C. If you don’t have one yet, you can read this article about the harmonicas I recommend the most for beginners.
Are you ready?
Let’s get started!
Table of Contents:
1. HOW TO HOLD THE HARMONICA
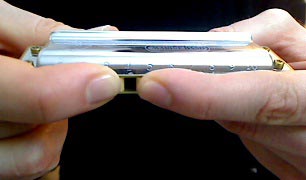
One of the first basic aspects to take into account when starting to play the harmonica is to learn how to hold it correctly, something fundamental to later be able to successfully achieve the two most used acoustic effects when playing: the hand tremolo (sometimes wrongly called “hand vibrato”) and the “wah-wah”, very characteristic effects of the harmonica sound.
We will look at the most commonly used harmonica clamping method commonly referred to as “standard reference”.
When holding the harmonica, keep the following in mind:
- You have to form an air chamber with your hands, as airtight as possible and of good size, trying to retain the sound inside the chamber and release it only when you move your right hand, opening the air chamber. The more airtight the chamber is, the better the acoustic effects will be and without much effort.
- The contact between the hand that holds the harmonica and the hand that covers the back of the harmonica must be firm enough so that the seal generated by both hands is effective and no air escapes in the closed air chamber position. Do not over-tighten the hands, as muscle tension is not good and impairs mobility on the harmonica.
- The notes in the low and middle register of the harmonica (cells 1 to 7), are the ones where you will use the acoustic effects the most, so with your right hand you should cover as much as possible the whole back of the harmonica over those 7 cells. You can verify this with the help of a mirror.
The harmonica is normally held with the cell numbers facing up, with cells 1, 2 and 3… (the lowest notes) on the left side, as on a piano. In this case, which is the most common, the left hand holds the harmonica and the right hand covers the back of the harmonica.
However, if you are a left-handed player (like me), the harmonica should be placed with the cell numbers down and the low notes on the right side; the right hand holds the harmonica and the left hand is placed behind to achieve the mentioned air chamber. Some great professional blues harmonica players were left-handed: Sonny Terry, William Clarke and Paul Butterfield; nowadays we can mention Sugar Blue, Lee Oskar and Carlos del Junco, among others.
The idea is that always, whether left-handed or right-handed, when playing and using this “standard reference” method of holding the harmonica, the lowest notes are in the hand that holds the harmonica, which is the one that will allow you to obtain the greatest airtightness.
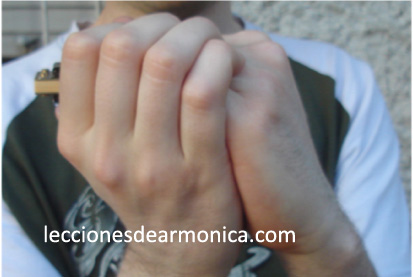
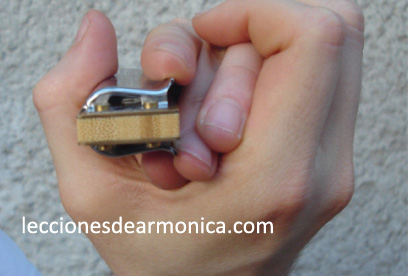
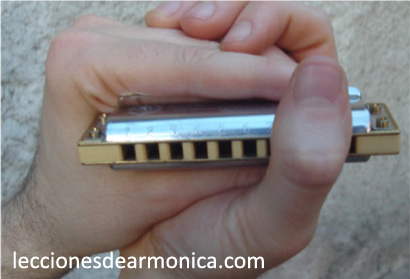
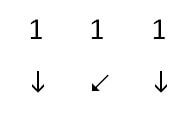
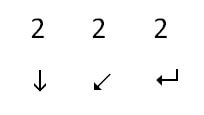
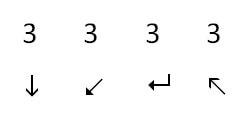
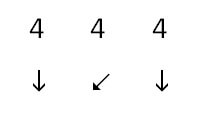
Below I share some photos where you can clearly see the position of the hands. The first three photos show from different angles how to make the air chamber in closed position and the last one with the air chamber open.
2.NOTES IN THE 10-HOLE DIATONIC HARMONICA
In the chart below you´ll see all the notes that are available in the 10-hole diatonic harmonica in the Key of C, when blowing and inhaling normally (without using special techniques) in each of the 10 cells, being the ones in the upper row the blow notes and those in the lower row, the draw ones.
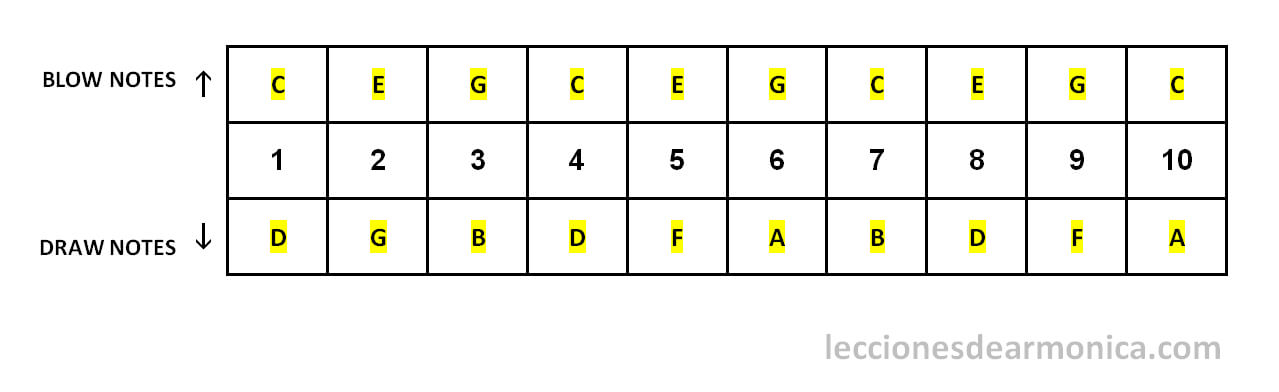
Keep in mind that if you have recently started with the harmonica or you have just bought a harmonica of this type and in the key of C, the first thing you have to learn is to try the clean sound of each of the 10 holes playing normally (without bending technique).
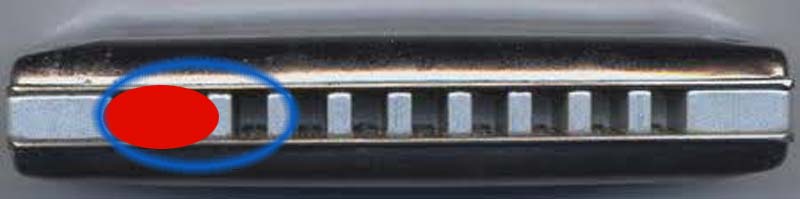
This type of harmonica is divided into 3 registers: Low (holes 1 to 3), Medium (holes 4 to 7) and High (holes 8 to 10).
Due to the construction of the harmonica in terms of resonant spaces, the easiest to control of the 3 registers is the middle register and from this register the beginner will find holes 4, 5 and 6 more accessible to play. The good news is that most of the easy and well known songs are for harmonica in C, they use the cells of the middle register and precisely holes 4, 5 and 6.
The complete major scale in this type of harmonica is located in the middle register and since we have a C harmonica, we obtain the C major scale from the hole 4 blow and passing through all the intermediate ones up to and including the hole 7 blow. If the harmonica was in the key of A, we would have the major scale of A in the middle register from the 4 blow up to the 7 blow, and so on.
After you have a good control in the Middle Register, that is to say that you get without problems the clean sound of each fixed cell (from 4 to 7) and you can move between them without problems, the next step is to practice in the cells of the High Register (8 to 10), starting with the blow cells and leaving for later the draw cells because of their greater difficulty.
I recommend that you leave the Low Register (cells 1 to 3 of the harmonica) for the end of your practice, because although the blow cells are not very complicated (they can only carry a little more air and are more tiring to play than the notes of the middle register), you will notice the most important difficulty in the lowest draw notes, because of their sensitivity to the bending technique and especially the 2 hole draw which is considered the most difficult to play well in all the harmonica.
Want to progress faster? Stop blowing aimlessly. With Bruno’s step-by-step method, you’ll learn to play your first songs in just 60 days.
See the Full Method →3. HOW TO PLAY SINGLE NOTES ON THE HARMONICA: CLEAN NOTES
There are three ways or methods of playing a single cell or playing “clean notes” and these ways of playing are called embouchure: which in the harmonica, as for other wind instruments, refers to the placement or contact of the mouth with the instrument to produce the sound.
The most common thing is that when you first play the harmonica, you can’t avoid playing several cells (two or more) at the same time. The idea is then that with the different embouchures we will see, and after practice and adaptation, you will learn to play without problems the clear and defined sound of a single cell.
For any of the three methods we are going to see and as a previous step, I advise you that before placing the harmonica in your mouth to play a single hole, you use your fingers to firmly block the cells that don’t have to sound, leaving free the cell you want to play, so you can hear and memorize the clean sound of the individual cell and then try to reproduce it using one of the three embouchures we will see to block using your lips or tongue.
3 types of embouchure for playing single notes (one cell) on the harmonica
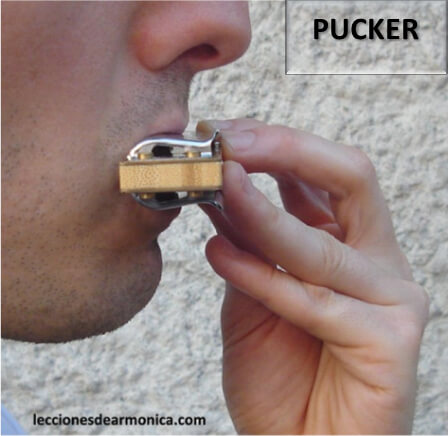
1. LIP BLOCKING:
Before using this embouchure and if your harmonica has a plastic comb like the Hohner Special 20, it’s sometimes convenient to moisten your lips to avoid friction when moving over the harmonica, especially if your lips dry out easily. It is also important that the contact of the harmonica with the lips, which block the cells that you don’t want to sound, is a firm contact, to avoid air leaks that affect the clean sound of the individual cell you want to play.
TWO WAYS OF LIP BLOCKING:
“PUCKER” or “PUCKERING”: the lips are placed forward as if you were going to give a kiss and form a hole of the same size of the cell, which makes the air flow go directly to it, blocking the cells of the sides with the corners of the lips.
This is the embouchure that appears most often in the harmonica methods for beginners, but it is not the one I recommend the most because it’s more difficult to achieve a good tone and it’s difficult to place the harmonica well inside the mouth without losing the good blocking of the cells that we don’t want to play.
A small part of the harmonica remains inside the mouth making it impossible to obtain a sound with good bass. The lips form a small and tight embouchure, generating a “bottleneck” in the passage of the air flow, elements that impair the good tone.
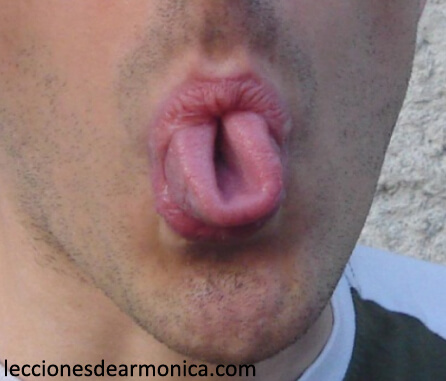
“LIPPING”: it’s a variant and improvement of the “pucker” embouchure. In this method of blocking the harmonica we incline it at an angle of between 30 and 45 degrees with respect to the lower lip and with a more opened mouth, the upper lip lies down covering half of the upper cover (in the “pucker” it covers the edge) and the harmonica rests on the lower lip, as if we were drinking from the spout of a bottle.
The great advantage is that with this embouchure we achieve a much more relaxed, natural and open position of the mouth, which in addition to getting a good tone, since the harmonica is more inside the mouth, allows us to block only with the lower lip and without much effort the cells that we do not want to sound, leaving the central cell free for a clean sound.
The inclination of the harmonica in the mouth not only simplifies the blocking to play individual cells but also facilitates the bending technique by changing the incidence of the air flow on the reeds.
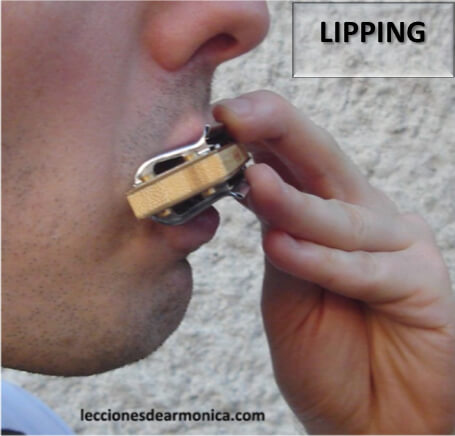
Lip blocking techniques in general have the advantage that the tongue is free inside the mouth (unlike the tongue blocking method) and this means that we can use it as a complement to obtain the bending technique more easily, since we can generate a more adequate resonant space by moving the tongue backwards, widening the resonant space inside the oral cavity.
Also, by having the tongue free inside the mouth, we can make use of the basic tongue articulations (the tongue strikes against the hard palate, cutting off the air), allowing us to define and/or accentuate the sound we produce.
2. CLASSIC TONGUE BLOCKING:
This is an embouchure in which we cover 3 or 4 cells with the mouth and with the tip of the tongue we block the notes that we do not want to sound, leaving free at one end the cell we want to play.
In general, the most commonly used technique is to cover 3 cells with the mouth and block with the tongue the two cells on the left side, leaving the rightmost cell free to sound as shown in the picture. However, the ideal is to also be able to master the blocking of the right side (leaving free the leftmost cell) to quickly access the cell jumps, without removing the mouth from the harmonica (tongue switch technique).
Advantages of tongue blocking:
- We can achieve a deep acoustic tone, as the harmonica fits naturally well inside the mouth which is open in a relaxed position, without any tension, when covering 3 or even 4 cells.
- It’s the only embouchure that allows us to achieve specific tongue effects: “tongue slaps”, “flutters”, “tongue trills”, among others, and to play intervals of cells or octaves: for example, playing cells 1 and 4 at the same time, blocking cells 2 and 3 with the tongue (the air passes through the corners of the mouth and sides of the tongue), all of which improves the interpretation and offers us many more variations of sounds.
- We can access the chords (3 or more cells at the same time) easily and quickly, just by lifting or retracting the tongue (unblocking).
Disadvantages of tongue blocking:
- The bending technique is more difficult to achieve, since the tongue is resting against the harmonica and we cannot retract it towards the throat to modify the resonant space of the mouth cavity, which is an important complement to obtain the bending notes. This is one of the main reasons why I recommend you to start with the “lipping” embouchure.
- It does not allow getting the tongue articulations or some quick air cuts to make for example staccato, since the tongue is not free on the “floor” of the mouth (as in lip blocking).
3. “U-TONGUE” OR “TUBE TONGUE”:
It’s a variant of the classic tongue blocking and by far the least used embouchure of the three. It consists of covering 3 cells with the mouth and placing the tongue in a “U” shape, so that the air current goes directly to the cell in the middle that we want to play, blocking with the tip of the tongue (the sides of the letter “U”) the cells at the ends. However, placing the tongue in a “U” position is a genetic issue and not everyone can do it, it is said that only 30% of the world’s population can have this ability.
Although I can place the tongue in a “U” shape as shown in the photo, I do not see any practical advantage to this embouchure and I do not recommend it at all to beginners.
Between the two most commonly embouchures, which is the best option?
I recommend that beginners start by using the lip blocking technique of lipping; you will find it easier not only for getting the clean sound of a single cell but also to get the bending notes and a better acoustic tone.
Once you have managed to play smoothly and cleanly each of the 10 cells of the harmonica, both blow and draw, and you have a good command over all the notes with draw bending located between holes 1 and 6, you can begin to incorporate (in parallel to the lip blocking) the classic tongue blocking, to add all those effects that we mentioned above and that contribute to improve your playing. The method that alternates lip blocking and classic tongue blocking is called “mixed embouchure” and is nowadays the most used by professional harmonica players.
The more control you have of both embouchures, the more sound variations you will have when playing, improving your interpretation. You will be able to alternate for example between lipping and classic tongue blocking, depending on the situation and what you want to play, always looking for the best advantages of each one.
4. HOW TO BEND NOTES ON THE HARMONICA: INTRODUCTION TO BENDING TECHNIQUE
Bending is the technique through which, by modifying the resonant space inside the mouth cavity (especially with the position of the tongue when using the lip blocking embouchure) and compressing the air flow in the throat, the pitch of certain notes can be altered by changing the incidence and pressure of the air on the reeds, achieving notes that are not in the harmonica while playing normally.
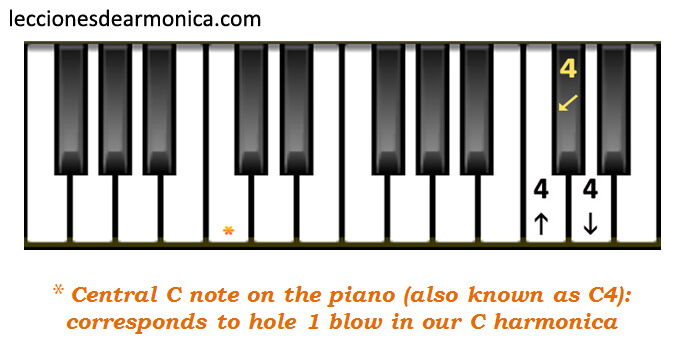
For example, if you have a harmonica in the Key of C and you apply bending to the hole 4 draw, you get a D flat (Db) or C sharp (C#), the black key on the piano, which is the “missing” note between the 4 blow (C) and the 4 draw (D). We can see this by looking at the location of the bending 4 draw in the image of the piano:
In the case of the common draw and blow bends (not the “overbends”), the pitch of the notes is lowered (with respect to the highest note of the cell), thus obtaining a total of 12 additional notes. Within these notes, there are the so-called “blue notes” of the blues scale (coming from African vocal singing); hence the importance of this technique for playing blues.
The bending technique is not exclusive to the harmonica, it is also applied to the guitar (altering the string tension), the keyboard (using the “pitch bend” lever) and the trumpet, among many other instruments. The case of the trumpet is the most similar to the harmonica in terms of the way to obtain the bending, although more complex because there are many more notes with bending and then it is necessary to regulate a great variety of different air pressures.
Types of Bending
In the standard 10-hole diatonic harmonica you can do 4 types of bending: draw bends (from cells 1 to 6), blow bends (cells 7 to 10), overblows (from cells 1 to 6) and overdraws (from 7 to 10), being the most used the draw bends.
In the case of overbends (overblows and overdraws), the note obtained is higher in pitch than the highest natural note of the cell (one semitone higher), while with draw and blow bends (the most common), the pitch of the notes is lowered from one semitone to one and a half tones, depending on the cell we are in.
What are the most commonly used bends in practice?
On any 10-hole diatonic harmonica you can make draw bends from cells 1 to 6 inclusive and blow bends from cells 7 to 10, but the most common bends used for Blues, Country and Rock, are the ones in holes 2, 3, and 4 draw.
The bending of the draw 1 (an octave lower than that of the 4) and the draw 6, most of the time are used as “bridge notes” or passage notes, played for a short time. On the other hand, although the draw 5 can technically and in practice be bent, it doesn’t become a definite note (it does not reach a full semitone). The same thing that happens with the draw 5 happens in the case of bending in the blow 7. Generally these bends (of ¼ tone) are used as passage and quick notes, for example they are usually used as pre-bends played as a short appoggiatura (very fast note).
If we look at a keyboard or piano, the reason why these holes (5 and 7), when bending, do not go down a semitone is because there is no note between the blow and draw notes: for example in cell 5, the blow note is E and the draw note is F and there is no intermediate note between them.
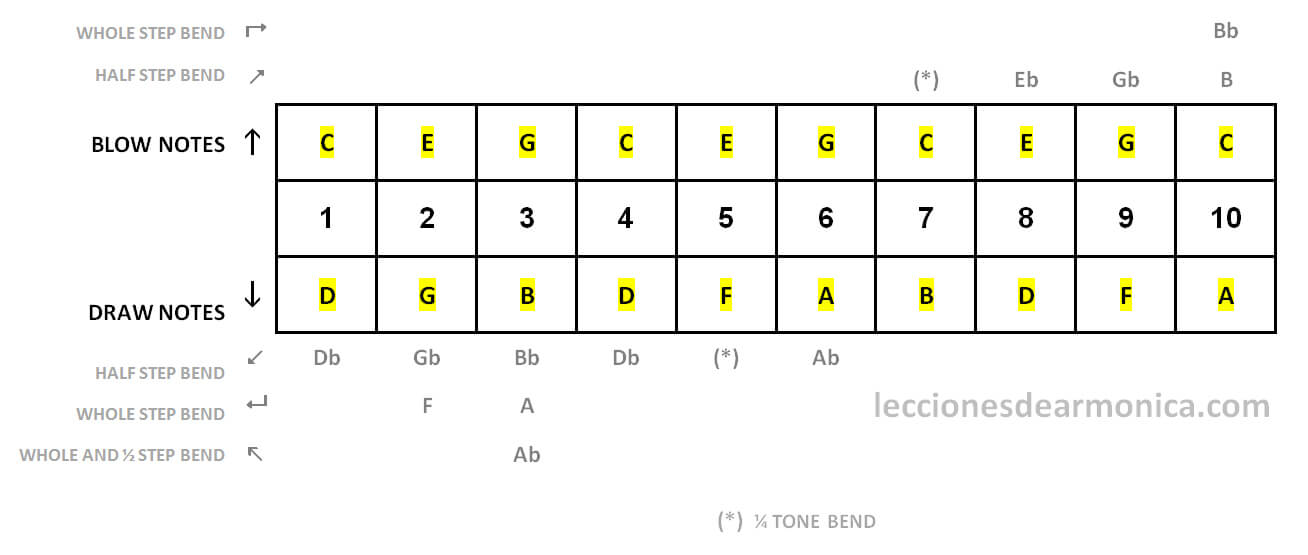
HARMONICA IN THE KEY OF C LAYOUT WITH ALL AVAILABLE DRAW, BLOW AND BENDING NOTES
Harmonica ni the key of C layout with all available draw, blow and bending notes:
Before starting with the bending technique, keep in mind these 5 important points:
- Have a great control over the technique in clean single notes on the individual holes of the harmonica, especially cells 1 to 6, where the draw bend notes are located.
- Bending is a technique achieved with constant and daily practice, not from one day to the next since it requires modifications in posture and muscular coordination that occur mainly within the mouth cavity and the throat which are not easy to find.
- Keep your body relaxed, avoiding extra muscular tensions that make you waste energy during bending; also use diaphragmatic breathing, as bending is difficult if we only breathe in from the mouth to the thorax. Avoid sucking of air.
- Do not increase the volume or intensity of the air. This is a big mistake; you can bend a note at a very low volume if the technique is correctly executed. Playing loudly repeatedly leads to premature detuning of the reed.
- Begin to practice draw bends on a harmonica tuned in the key of C, since within the standard tunings, C is neither too low nor too high; this way we will have to make fewer changes inside our body to achieve the technique. It is recommended that you use a good quality harmonica, a mid-range such as Hohner Special 20, Hohner Golden Melody or Tombo Lee Oskar (“major diatonic” model, with the orange label on its case). As bending is based on controlling the airstream, the harmonica should not be bound to lose air, like the inexpensive line of Hohner harmonicas made in China.
Practical tips on how to achieve draw bending notes
To achieve the appropriate bending, carry out the 5 following actions simultaneosly:
BRING THE BACK OF THE TONGUE UP AGAINST THE THROAT, WHILE ALWAYS LEAVING THE TIP OF THE TONGUE ON THE “FLOOR” OF THE MOUTH
The tongue retracts, moving away from the teeth, and its new position allows the compressing or narrowing of the air flow against the palate near the throat; at the same time it expands the closest resonance chamber to the embouchure and the harmonica. This is the most important change needed to accomplish bending.
The backward movement of the tongue will depend on the note we want to bend: the higher the bending note, the lesser backward movement of the tongue is required, higher notes require less space for adequate resonance. On the other hand, the lower the note, the greater the backward movement of the tongue, which increases the inner resonant chamber. For this reason, on harmonicas tuned in C, we will have to make minimal movements of the tongue to bend draw hole 6, and greater movements, for example, to bend the lower draw notes on holes 1 and 2.
During the bending process (in draw notes), when moving the tongue backwards, the frequency ratio of the reed changes and the resonant space within the oral cavity will adjust to that new lower frequency.
A practical way to achieve the mentioned tongue movement is to pronounce syllables during bending. For example, some methods suggest: “EEE” – “OOO” – “EEE”, where “EEE” (an extended sound of the vowel in “BED”) is the regular draw note and “OOO” (as in “KANGAROO“) is the bending note, playing bound notes (with a single air intake).
This is quite true, although what works for me to compress the air flow near the throat is to pronounce these syllables while drawing air: “AAA – KOO – AAA” (the sound of the letter A in “HAND”, and the syllable “KOO” as pronounced in the word “CUCKOO“). Bending occurs in the central syllable, and air compression is achieved more quickly by incorporating the plosive sound of the consonant K.
LOWER THE JAW TO EXTEND THE RESONANCE SPACE IN THE ORAL CAVITY
When doing the movement of the tongue we previously described, the jaw joins in the new tongue position, automatically moving down, and a little backwards. This movement is a complement that allows more space inside the oral cavity next to the embouchure.
In general, the deeper the bend (of 1 or 1 and ½ tone) or the lower the draw notes are, the further we must lower the jaw to achieve the appropriate resonant space, and in the case of harmonicas with lower tunings such as G and A, I also recommend tightening up the throat with the chin, at least on the first attempts.
RAISE THE SOFT PALATE TO ENLARGE THE RESONANCE SPACE IN THE ORAL CAVITY
A complementary movement is to simultaneously move the tongue backwards, lower the jaw, and raise the soft palate near the throat. We can easily achieve this by imitating a yawn.
KEEP MUSCLE RELAXATION, ESPECIALLY IN THE FACE AND EMBOUCHURE AREAS
Relaxation of the facial muscles is very important during bending to keep a good control of the air flow. Although bending can be achieved with muscular tension of the lips, I do not recommend it because lip muscles are unstable, and this makes it difficult to offer the adequate resistance, stability and volume that bending requires.
BREATHE CORRECTLY
The bending technique is based on controlling the air flow. It’s about making the most of air intake, insofar as there are no leaks of air from the embouchure to the diaphragm. Diaphragmatic breathing becomes crucial here since bending is quite difficult if air is simply inhaled from the mouth up to the chest.
The diaphragm is in charge of managing the air pressure, while the oral cavity along with the mouth, tongue and upper throat (opening) as a whole will shape this air flow, restricting the passage of air between the tongue and the palate. Deep breathing using the diaphragm makes bending easier. Also, during bending we should avoid the passage of air through the nose, that is, we will have to breathe entirely through the mouth.
Final Thoughts on Bending
When we first start to experiment with bending technique, it is quite complex to get it voluntarily. As we’ve already seen, it implies an important muscular coordination (throat, tongue, etc.), but persistent practice makes perfect, and as we memorize the proper muscular position (correct bending posture), it becomes more natural.
If you want to check whether you are really reaching the note (bend note with good intonation) and you don’t have a piano or any other instrument at hand to compare the sound, “Harmonica Tuner” is a very useful application for mobile phones that can be of great help. This app colors the harmonica box in real time as we play. Another way to check the tuning of the bend notes is to use chromatic tuners, like the mobile app “Soundcorset”. It incorporates a tuner and a metronome. The tuner must be set at A= 442 or 443 hz for the measurement to be more accurate since nowadays harmonicas generally tune around that frequency.
It is not advisable to test bending on any other hole before having a good control of the draw bend on hole 4. Furthermore, the exercise I recommend to start with the bending is the one that includes draw 4 prior to bend draw 4; this way we have the reference of the regular draw note. Remember, the first bend draw exercise that you should try is: regular draw 4, bend draw 4 and then return to regular draw 4, doing everything with the same inhaled airstream (linked passage).
Audio samples of all draw bending notes between holes 1 and 6 of the diatonic harmonica tuned in the key of C:
As you can see, on holes 2 and 3 I first play the common draw note of each cell and then all the notes with bending available. Meanwhile, for holes 1, 4, 5 and 6 I first apply bending and then I back to the unbend notes. In all cases I play in a slurred way, without interrupting the air flow which, as I mentioned before, is the most accessible way to start practicing. Then, to increase difficulty, you can try cutting the air between one note and the next.
***
I hope this article has helped you through your first steps learning this wonderful instrument, that you’ve gained all the basics on the harmonica, and enough enthusiasm!
If you are having trouble using any of the techniques here, don’t worry, you are getting started, just keep practicing!
Leave your questions below and I will be happy to answer you.
To continue learning I highly recommend my e-book “Harmonica for Beginners“!
This is possibly the most explicit but clear intro I’ve found on playing the harmonica – I have been ‘playing at’ learning for over a year – ‘Playing at’ meaning that I don’t practice enough (time and personal situation prevent) and although I have been able to learn some tunes from Tab music, I am still unable to hit single notes properly – so that is a block to going further e.g. into bending etc (though I know how to bend and can do so, just not apply it in actual music playing). However I am excited to find this document today, as it is a day in which I have a few hours peace and quiet on my own to practice. Frustrating that the basic of how to correctly position the harp in the mouth and get a narrow enough embouchure and position on the mouthpiece is so much of a challenge. Must admit that I thought the Harmonica was basically a chordal instrument, not one that is a lot harder than it looks!
Thank you very much Greg for your comment, I’m glad you found it useful!
Hi Bruno –
I have just bought my first harmonica and am really excited to learn to play. Thank you for this beginner instruction. I hope after lots of practice I will get the hang of it!
I am 66 years old. 🙂
Hi! Excellent, I hope you enjoy your new musical journey with the harmonica!
In a table of yours in the article, its shown that the F note doesn’t exist but I’ve got a simple C harmonica in which i can easily play c d e f g. No problem about F note.
Thanks
Hi Levy, the table shows all the unbent notes and the F note as you can see it is on hole 5 draw and 9 draw. The F note also exists on the low register but only as a whole step bend on hole 2 draw. Regards!
Thank you. Maybe it’s just too late for a 76 year old?
Hi Tom, never it’s too late for learning harmonica. Btw, I have a 74yrs old student from the United States. Regards!
Thank you. I will keep trying, and will send you another “thanks” when I feel I have made some meaningful progress, but it may be a while. Thanks again.